
- Introduction to Video Storyboarding

- How to Create a Video Storyboard
- Storyboarding for Different Types of Videos
- Common Mistakes in Video Storyboarding and How to Avoid Them
Introduction to Video Storyboarding
Storyboarding is a critical aspect of video production, enabling creators to visualize the sequence of their project before filming begins. Unlike storyboards for still images or print, video storyboarding requires consideration of movement, timing, and transitions between scenes.
To storyboard a video, you must sketch out each scene, add details like camera angles and dialogue, and plan transitions and timing. This process, while complex, is integral to creating compelling motion graphics and ensuring a smooth production process.
A video storyboard template provides a structured framework for this process, offering predefined boxes for sketches, annotations, and scene descriptions. These templates serve as a visual representation of the narrative flow, guiding the filmmaker through each step of the story's progression. While some creators opt for detailed illustrations, others might simply use stick figures to convey character placement and basic actions. Regardless of the level of artistic detail, the storyboard template serves as a roadmap for bringing the script to life on screen.
Storyboard software for video agencies & brand teams
One workspace for storyboards, animatics, comments, and approvals. Spend time on the creative, not the back-and-forth.

Elements of Visual Storytelling
The key elements of visual storytelling to consider when storyboarding for video:
 Use layering to compose your scenes.
Composition: This refers to how the elements of a scene are arranged. Good composition can guide the viewer's eye and emphasize important parts of the scene. When storyboarding, think about where you want to place your subjects, props, and backgrounds in each frame. Consider different composition techniques, such as the rule of thirds or the golden ratio, to create visually appealing and balanced scenes. Incorporating these considerations into a video storyboard template can streamline the planning process.
Color: Color can set the mood of a scene, draw attention to specific elements, or symbolize certain themes. When storyboarding, consider how you can use color to enhance your story. For example, you might use bright, saturated colors for a cheerful scene or desaturated, cool colors for a somber one. Using a video storyboard template allows you to designate color choices and their intended effects in each scene.
Lighting: Lighting can dramatically affect the look and feel of a scene. It can highlight important subjects, create depth, and set the mood. In your storyboard, indicate the source and direction of light in each scene. Also, consider the quality of light (e.g., harsh or soft) and its color temperature (e.g., warm or cool). A storyboard template provides space to detail lighting setups and effects, ensuring consistency and coherence throughout the production.
 An example of a pan camera move in storyboard form.
Movement: Unlike storyboards for still images or print, video storyboards need to account for movement. This includes the movement of the camera and the subjects within a scene. When storyboarding, indicate any camera movements (e.g., pans, tilts, zooms) and subject movements (e.g., walking, running, gesturing) in each frame. Video storyboard templates with designated areas for depicting movement helps visualize dynamic scenes more effectively.
Timing: Timing is critical in video storytelling. It determines the pace of the story and can create tension, surprise, or emotional impact. In your storyboard, specify the duration of each scene and the timing of key actions or events. A video storyboard template with timelines or annotations for timing assists in planning the pacing and rhythm of the narrative effectively.
Remember, the goal of storyboarding for video is not just to tell a story, but also to plan the production process. By considering these elements of visual storytelling, you can create a storyboard that serves as a comprehensive guide for your video production.
Creating a Video Storyboard with Boords: A Comprehensive Step-by-Step Guide
Step 1: Create a New Video Storyboard
 Use Boords' AI Script Generator to quickly outline your Video storyboard.
Log into your Boords account and click on the 'Create New Storyboard' button. Enter a name for your storyboard that reflects your project or scene.
Naming your storyboard appropriately can help you and your team to manage and locate it easily later, especially if you're working on multiple projects.
Step 2: Add Frames to your Video Storyboard
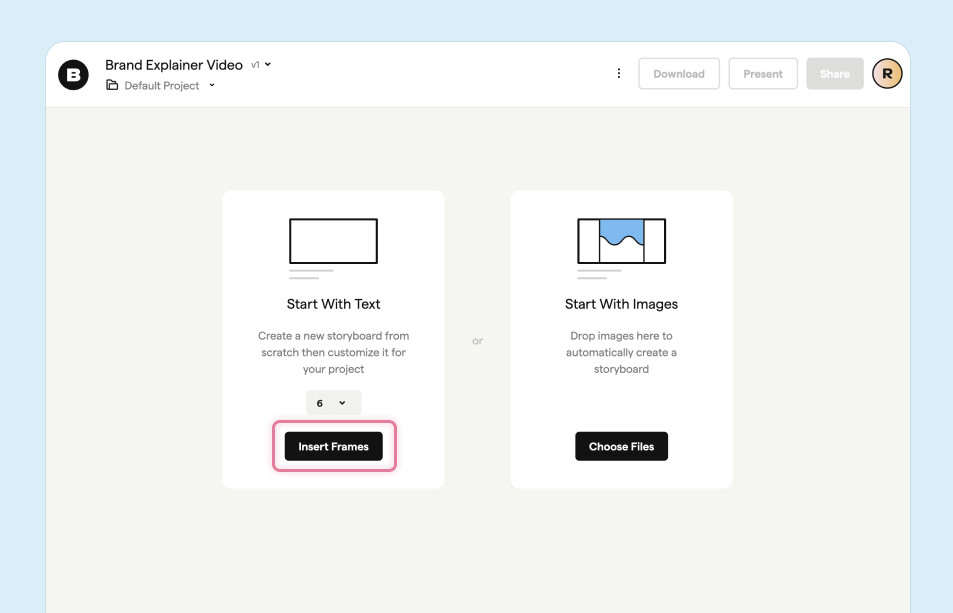
Click on the 'Insert Frames' button to start adding scenes to your storyboard. You can add as many frames as you need to tell your story.
Consider the length of your video and the complexity of your scenes to determine the number of frames you need. Remember that each frame represents a key moment or change in your story.
Step 3: Sketch or Upload Images
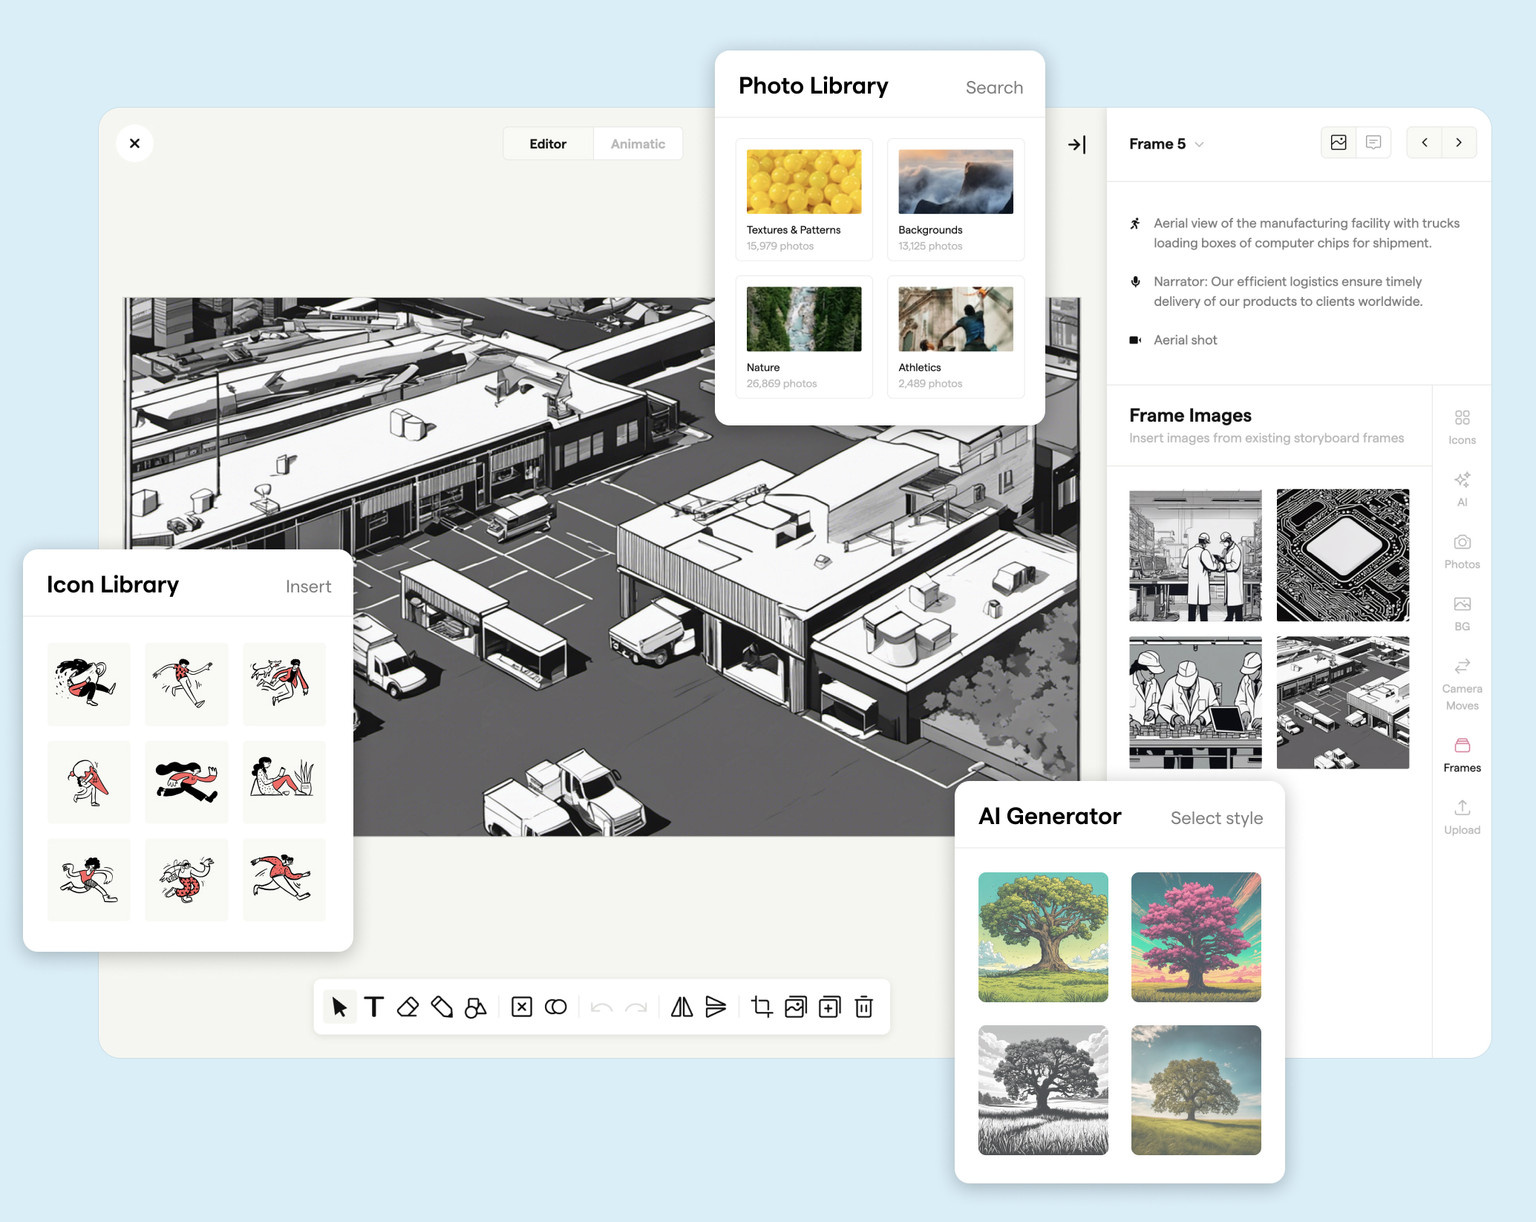
Use Boords' built-in drawing tools to sketch your scenes or upload images if you have them prepared. Make sure each image accurately represents the action, composition, and framing of the scene. Whether you opt for stick figures or detailed rough sketches, ensure they effectively convey the narrative and visual elements for your final video.
Remember to consider the elements of visual storytelling as you sketch or choose your images. Think about composition, color, lighting, and movement, and how these elements can enhance your story and guide your video creation process.
Step 4: Add Descriptions and Notes
 Add custom note fields to describe your storyboards.
For each frame, add a description and any necessary notes. These should include details about the action, dialogue, camera movement, and any other relevant information.
The more detailed your descriptions and notes, the easier it will be for your team to understand your vision and execute it during production.
Step 5: Indicate Timing
Use the timing feature in Boords to indicate the duration of each scene and the timing of key actions or events. This will help to establish the pace of your story.
Remember that timing is crucial in video storytelling. It can create tension, surprise, or emotional impact, so think carefully about the timing of each scene and action.
Step 6: Review and Adjust
 Add statuses to frames indicate workflow status.
Once you've added all your frames, descriptions, and timing, review your storyboard as a whole. Make any necessary adjustments to ensure your storyboard tells your story effectively and serves as a comprehensive guide for your production.
Consider viewing your storyboard as an animatic to get a sense of how your video will flow. Boords' animatic tool can help you to see if your story makes sense, if the pacing is right, and if there are any gaps or issues that need to be addressed.
Step 7: Share and Collaborate
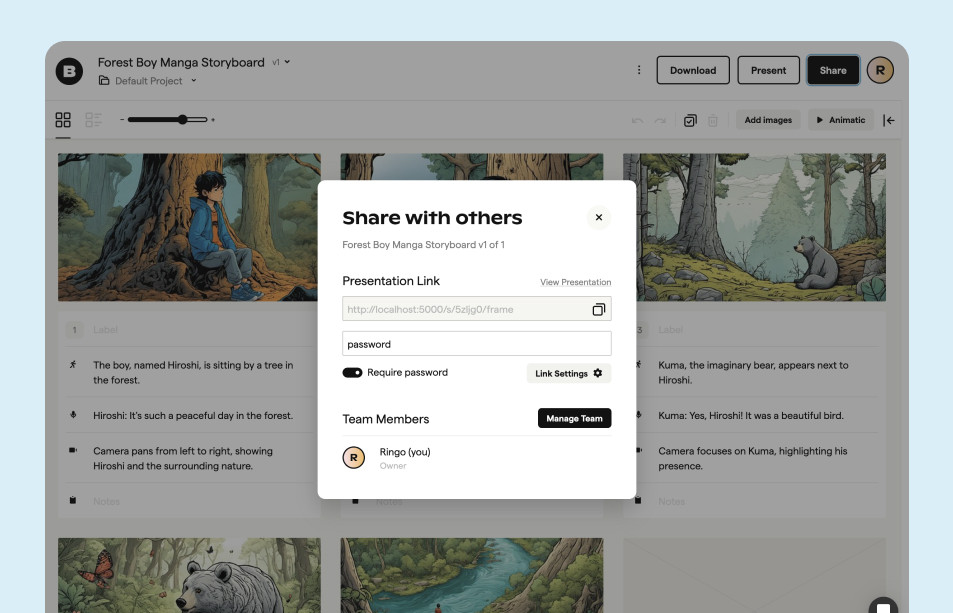 Share a password-protected link to your storyboard to gather feedback.
When you're happy with your storyboard, share it with your team. Boords makes it easy to collaborate, with features that allow for real-time updates and feedback.
Encourage your team to provide feedback and suggestions. Collaboration can lead to new ideas and improvements, resulting in better videos.
Storyboarding is an iterative process. Don't be afraid to make changes and revisions as you go along. With practice and the help of tools like Boords, you'll be able to create effective video storyboards that bring your stories to life.
Features and Benefits of Using Boords for Video Storyboarding
Boords is a powerful tool designed to streamline the storyboarding process, particularly for video and motion graphics. It offers a host of features that simplify and enhance each step of the process, making it an invaluable resource for filmmakers, animators, and video producers alike. Here are some of the key features and benefits of using Boords for video storyboarding:
Intuitive Interface: Boords boasts a user-friendly interface that makes it easy to create and edit detailed storyboards. You can quickly add, remove, or rearrange frames using the drag-and-drop feature. This intuitive design makes it accessible for beginners while still offering the advanced features that professionals need.
Collaboration Tools: Boords allows for easy collaboration among team members. You can share your storyboard with others, who can then provide real-time feedback and suggestions. This allows you to effectively communicate with the production team, ensuring everyone is on the same page with the same creative direction.
Built-in Drawing Tools: With Boords, you don't need to switch between different software to sketch your scenes. The platform offers built-in drawing tools that let you sketch directly onto your frames. This feature can save you time and streamline your workflow.
Image Upload: If you prefer to create your sketches or images elsewhere, Boords allows you to easily upload them into your storyboard. You can also add notes and descriptions to each frame to provide further context or instructions.
Timing Indicators: As we've discussed, timing is a crucial element in video storyboarding. Boords makes it easy to indicate the duration of each scene and the timing of key actions or events, helping you to plan the pace and rhythm of your video.
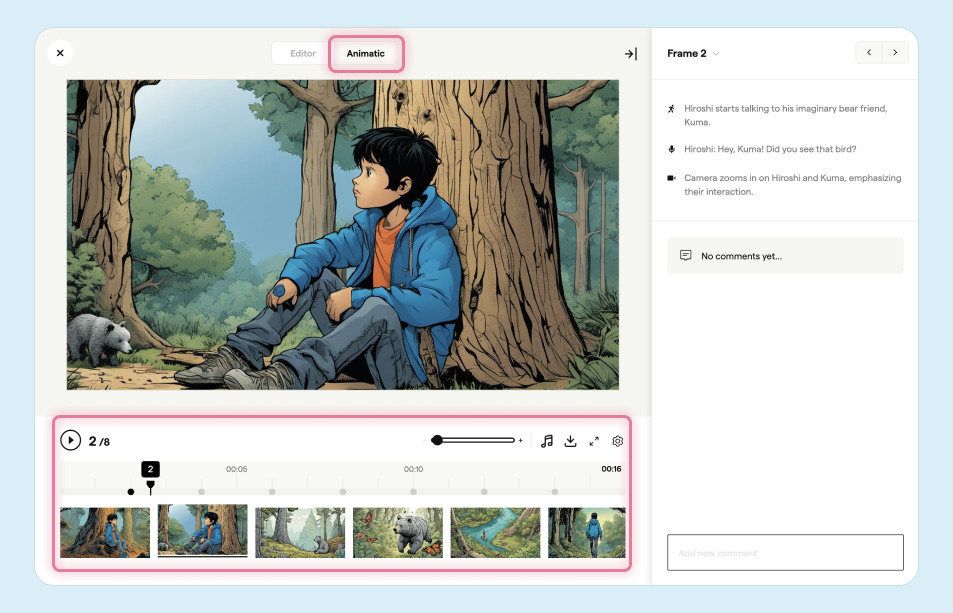
Animatic Preview: Boords offers an animatic tool that lets you preview your storyboard as a sequence of images. This can give you a sense of how your video will flow and allow you to spot any potential issues or gaps in your story.
Storyboard Templates: If you're new to storyboarding or looking to save time, Boords offers a variety of free storyboard templates. These templates can provide a starting point to create storyboards and help you to structure your scenes effectively.
 Quick-export in multiple formats.
- Storyboard Export: Once your storyboard is complete, Boords allows you to export it in various formats, including PDF and animated GIF. This makes it easy to share your storyboard with clients, stakeholders, or team members who may not have access to Boords.
By using Boords for your video storyboarding, you can streamline the process, enhance collaboration, and ensure you're effectively planning each aspect of your video. Whether you're creating a marketing video, a short film, or an animation, Boords offers the tools and features you need to bring your vision to life.
Storyboarding for Different Types of Videos
Storyboarding is a universal process, used in various forms of video production. However, the approach can differ slightly based on the type of video you're creating. Here, we'll explore how to adapt your storyboarding process for different types of videos, such as commercials, short films, documentaries, and animations.
Commercials
Commercials typically have a short duration, often ranging from 15 seconds to a minute. This means every second counts, and the storyboard must be precise and detailed. Each frame should clearly depict the key message, product, or service being advertised.
The storyboard should also indicate the timing for each scene, as commercials require a fast pace and quick transitions between scenes.
Short Films
Short films, while longer than commercials, still require a concise storytelling approach. The storyboard for a short film should clearly outline the narrative arc, character development, and key plot points.
Unlike commercials, short films often have more room for creative and artistic expression. Therefore, the storyboard can include more experimental camera angles, lighting techniques, and composition choices.
Documentaries
Documentaries often involve real-life footage, interviews, and sometimes unpredictable events. While it might seem challenging to storyboard for such a dynamic format, it's still beneficial. The storyboard can outline the planned interviews, locations, and narrative structure.
It can also include placeholders for potential footage or events. This approach provides a visual aid but still allows for flexibility and spontaneity during filming.
Animations
Animations, particularly motion graphics, rely heavily on storyboarding. Since every element of an animation must be created from scratch, the storyboard serves as a blueprint for the animators. It should include detailed descriptions of the characters, settings, movements, and transitions. The storyboard for an animation might also include color palettes, style references, and timing for each frame.
Regardless of the type of video you're creating, the principles of storyboarding remain the same. Your storyboard should visually represent your narrative, plan your pre-production process, and serve as a communication tool for your team. By adapting your approach based on the video type, you can ensure your storyboard effectively guides your project from concept to completion.
Common Mistakes in Video Storyboarding and How to Avoid Them
Storyboarding for video, particularly motion graphics, is a complex process that requires careful planning and execution. Even experienced creators can make mistakes that compromise the effectiveness of their storyboards. Here, we'll discuss three common mistakes in video storyboarding and provide tips on how to avoid them.
Mistake 1: Neglecting the Element of Time
Unlike storyboards for print or still images, storyboards for video must account for the element of time. This includes the duration of each scene, the timing of key actions or events, and the transitions between scenes.
How to Avoid: Make sure to include timing indicators in your storyboard to help during video editing. Specify the duration of each scene and the timing of key actions or events. Also, plan the transitions between scenes to ensure a smooth flow. Tools like Boords can help you to easily indicate timing in your storyboard.
Mistake 2: Overcomplicating the Storyboard
 Storyboard example of a simple 'scamped' sketch for a frame.
While it's important to provide detailed descriptions and notes in your storyboard, there's a risk of overcomplicating it. Too many details can make the storyboard confusing and difficult to follow, especially for team members who are not familiar with the project.
How to Avoid: Keep your storyboard simple and clear. Use concise descriptions and notes, and only include the most essential information. Make sure each frame visually represents the key moment or change in the scene. If you need to provide additional information, consider using a separate document or a tool like Boords that allows you to add notes to each frame.
Mistake 3: Ignoring the Production Process
A common mistake in creating storyboards is focusing solely on the story and ignoring the production process. Your storyboard should not only tell your story but also serve as a guide for your production. It should indicate the camera angle, lighting, movement, and other technical aspects that need to be executed during filming.
How to Avoid: When storyboarding, consider the overall direction. Indicate the camera angles and movements, the lighting direction and quality, and the movement of the subjects within each scene. Also, plan the props, costumes, and locations for each scene. Remember, your storyboard should serve as a comprehensive guide for your video production, helping your team to understand your vision and execute it effectively.
Sharper preproduction, less back-and-forth
Workflow tips and Boords product updates for video and brand teams, twice a week.
More from the blog


Storyboard software for video agencies & brand teams
One workspace for storyboards, animatics, comments, and approvals.
Spend time on the creative, not the back-and-forth.


Storyboard Activity
Sarah changed the status of Explainer Video v3 to Approved
8 JulSarah viewed Explainer Video v3
8 JulTom shared Explainer Video v3 with sarah@beacon.co, dev@beacon.co
7 JulTom changed the status of Explainer Video v3 to Review Needed
7 JulTom created Explainer Video v3, a new version of Explainer Video v2
7 JulAmara marked a comment on Explainer Video v2 as complete
7 JulDev commented on Explainer Video v2 - Frame 4
6 JulStoryboard Activity
Sarah changed the status of Explainer Video v3 to Approved
8 JulSarah viewed Explainer Video v3
8 JulTom shared Explainer Video v3 with sarah@beacon.co, dev@beacon.co
7 JulTom changed the status of Explainer Video v3 to Review Needed
7 JulTom created Explainer Video v3, a new version of Explainer Video v2
7 JulAmara marked a comment on Explainer Video v2 as complete
7 JulDev commented on Explainer Video v2 - Frame 4
6 Jul