

- Why Use Boords for Storyboarding

- Choosing the Right Tools
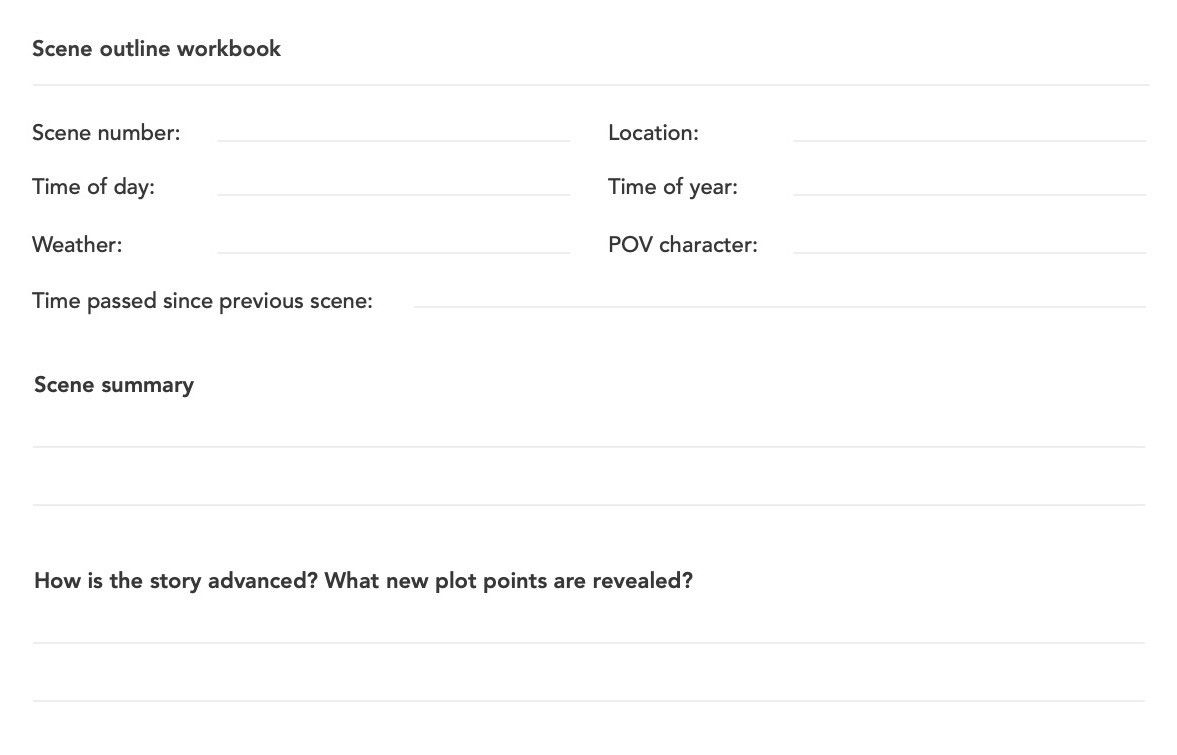
- Step-by-Step Guide on How to Make a Storyboard for a Book
- Practical Tips and Examples
- Understanding Storyboard Terminology
Ever wondered how to transform the vivid narrative of a book into a compelling visual journey?
In this comprehensive guide, we will walk you through the step-by-step process of creating a storyboard for a book, using Boords - an intuitive online storyboard software, and provide practical tips and examples to help you master this art.
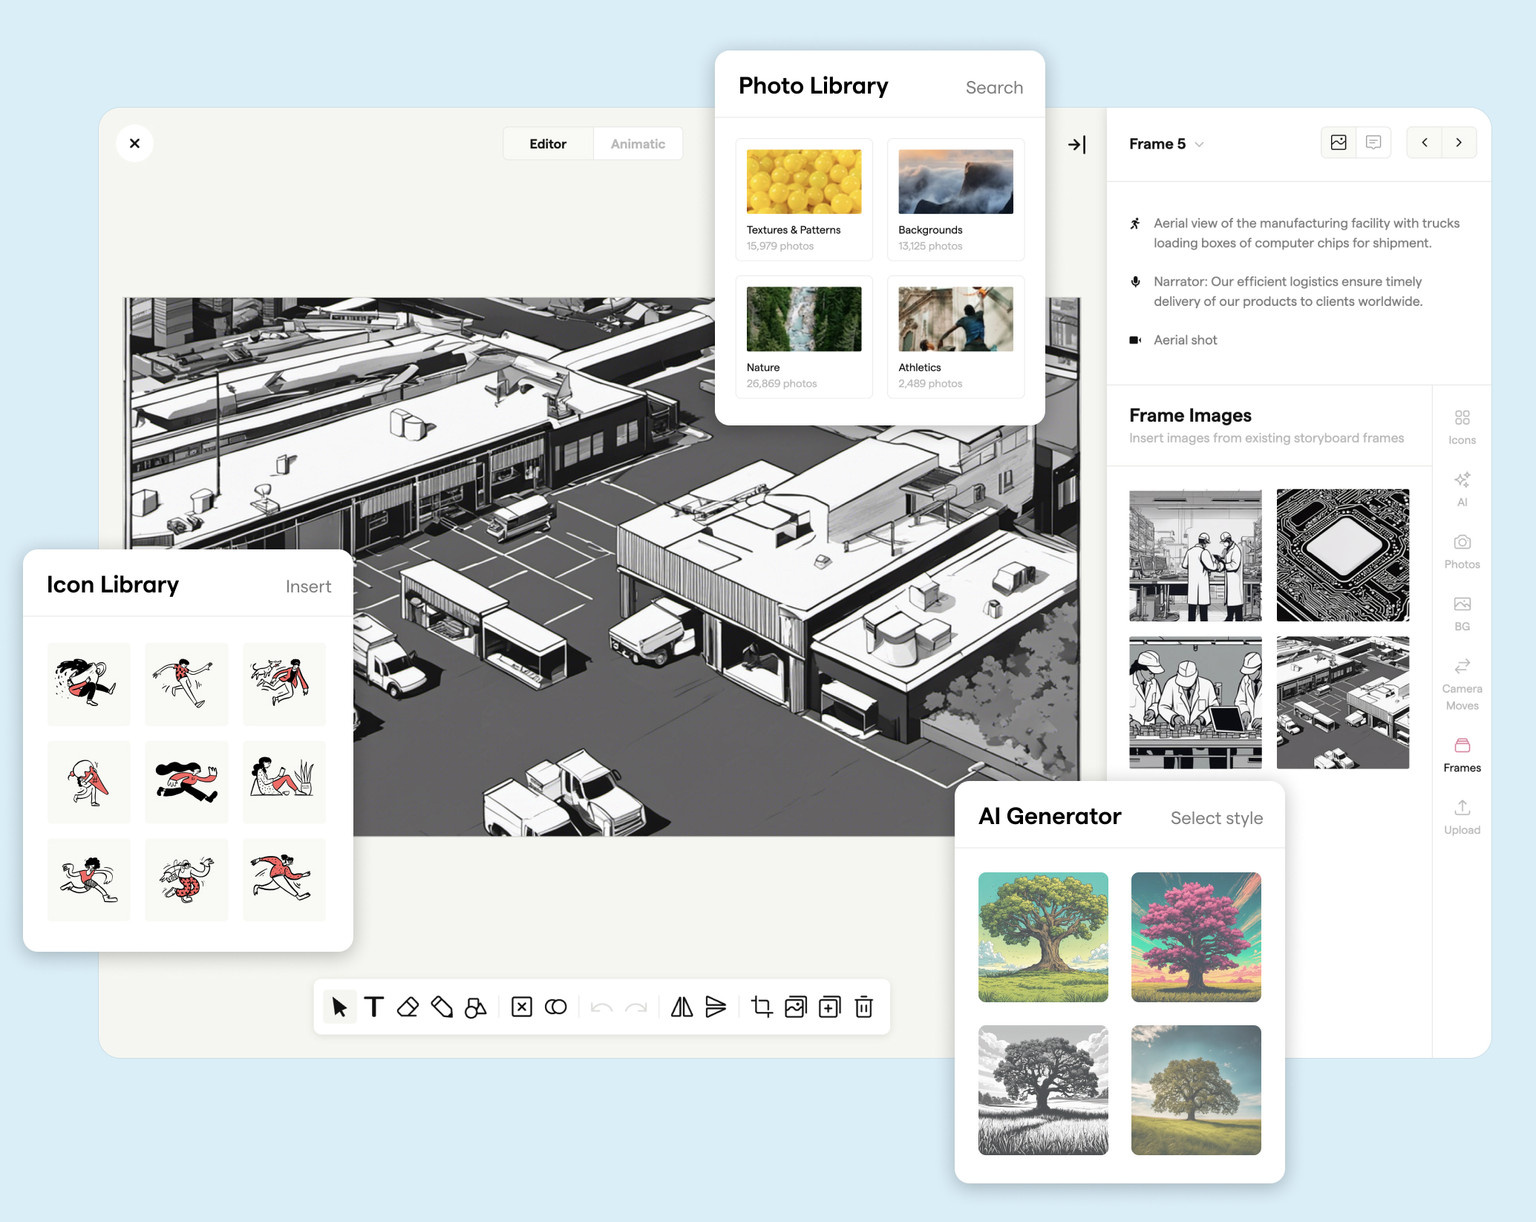
Why Use Boords for Storyboarding
Imagine having a tool at your disposal that transforms the intricate narrative of your book into a vivid visual journey, allowing you to collaborate, add detailed notes, specify timing, and effortlessly arrange scenes.
Whether you're mapping out a complex fantasy novel or a simple children's book, Boords provides the features and flexibility you need to bring your vision to life.
Boords is a go-to tool for both beginners and professionals, allowing you to sketch or upload images, arrange them in sequence, and add text descriptions or dialogue for each frame. Its standout feature is the real-time collaboration capability, eliminating the need for back-and-forth emails and version control struggles. Whether you're mapping out a complex fantasy novel or a simple children's book, Boords provides the features and flexibility you need to bring your vision to life.
Storyboard software for video agencies & brand teams
One workspace for storyboards, animatics, comments, and approvals. Spend time on the creative, not the back-and-forth.

Choosing the Right Tools
Whether you're a traditionalist who prefers sketching scenes on paper with pencils or a tech-savvy individual who leans towards digital drawing tablets, the choice of tools is crucial.
For those who prefer a blend of both, Boords, an online storyboard software, offers an intuitive platform where you can upload hand-drawn sketches or create digital ones, arrange them in sequence, add notes, and collaborate with others, making it a versatile tool for all types of storyboard creators.
Step-by-Step Guide on How to Make a Storyboard for a Book
Step 1: Understanding the Book
Diving into the world of your chosen book is the first crucial step in creating an effective storyboard. It's not just about reading the book, but immersing yourself in its narrative, understanding the nuances of the plot, and getting to know each character intimately. Identifying key scenes, pivotal plot points, and character development arcs will serve as the foundation for your storyboard, helping you visualize and capture the essence of the book in a compelling, visual format.
Step 2: Creating a Script
Creating a script is the blueprint of your storyboard, acting as the skeletal framework on which your visuals will be built. It involves condensing the narrative of the book into key scenes, dialogues, and actions, essentially translating the written word into a visual format. With Boords, you can easily create and edit your script, ensuring that each scene is meticulously planned out, setting the stage for the next step - sketching your scenes.
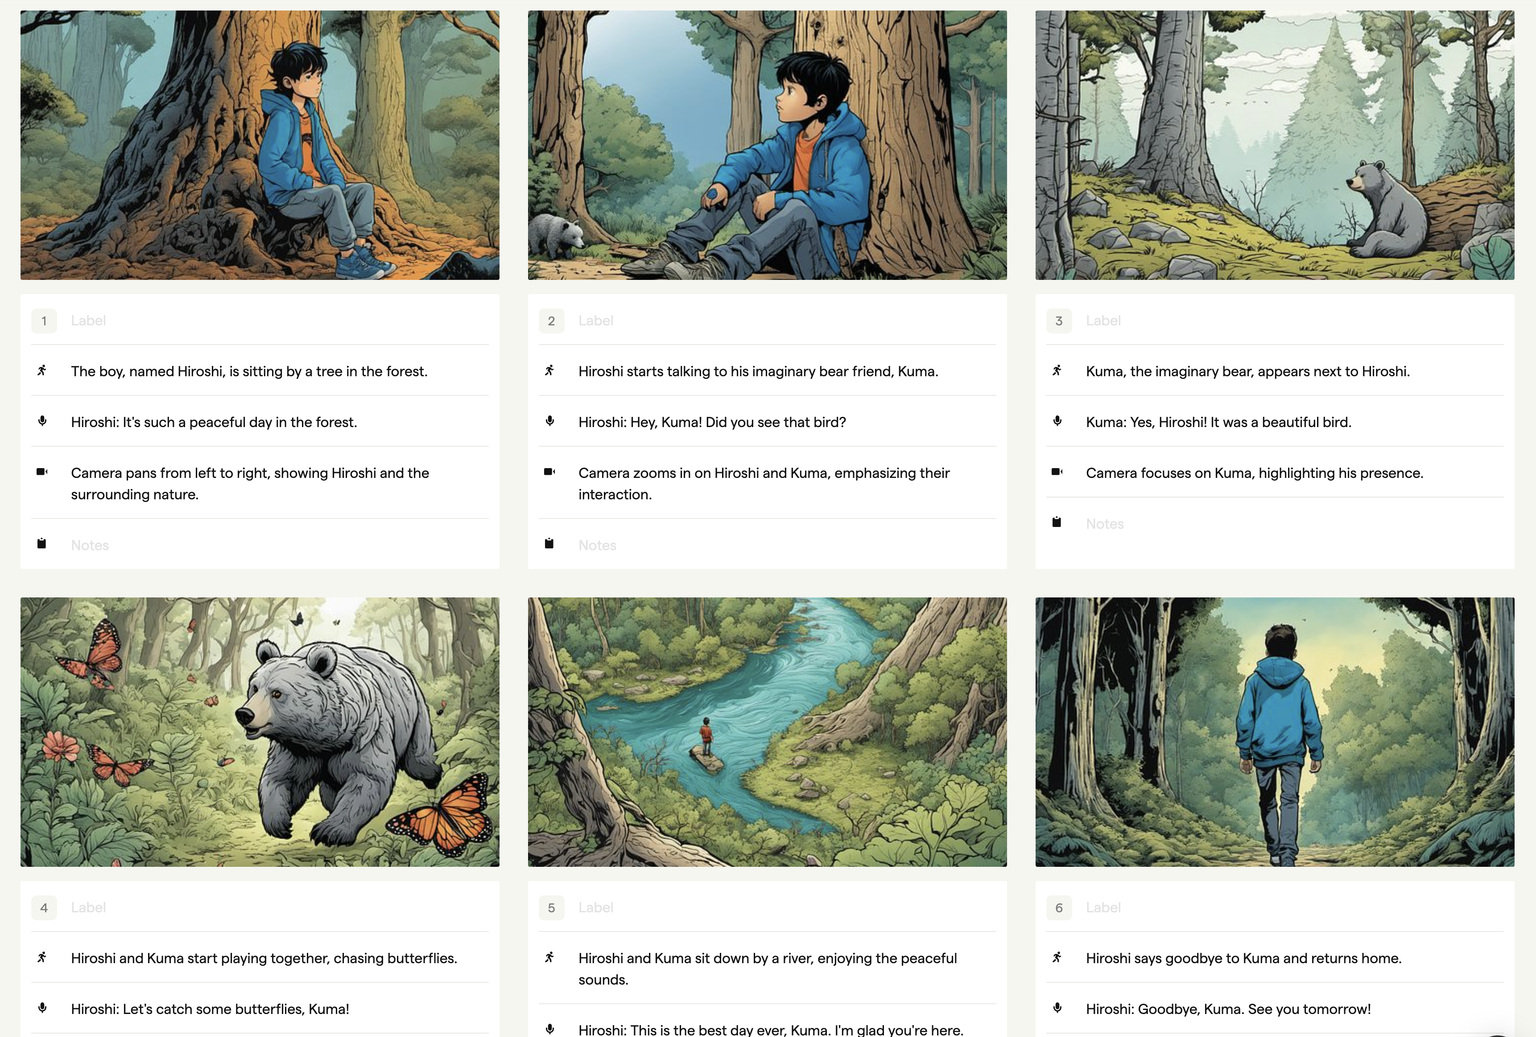
Step 3: Sketching Scenes
 Sketch scenes or quickly create images with our AI Storyboard Creator.
Sketching scenes is where your story truly begins to take shape, transforming words into visual cues. This step involves translating the script into rough sketches or drawings, capturing the essence of each scene and its key elements. With Boords, you can either sketch directly onto the platform or upload your hand-drawn images, providing flexibility to work in a way that suits your creative process best.
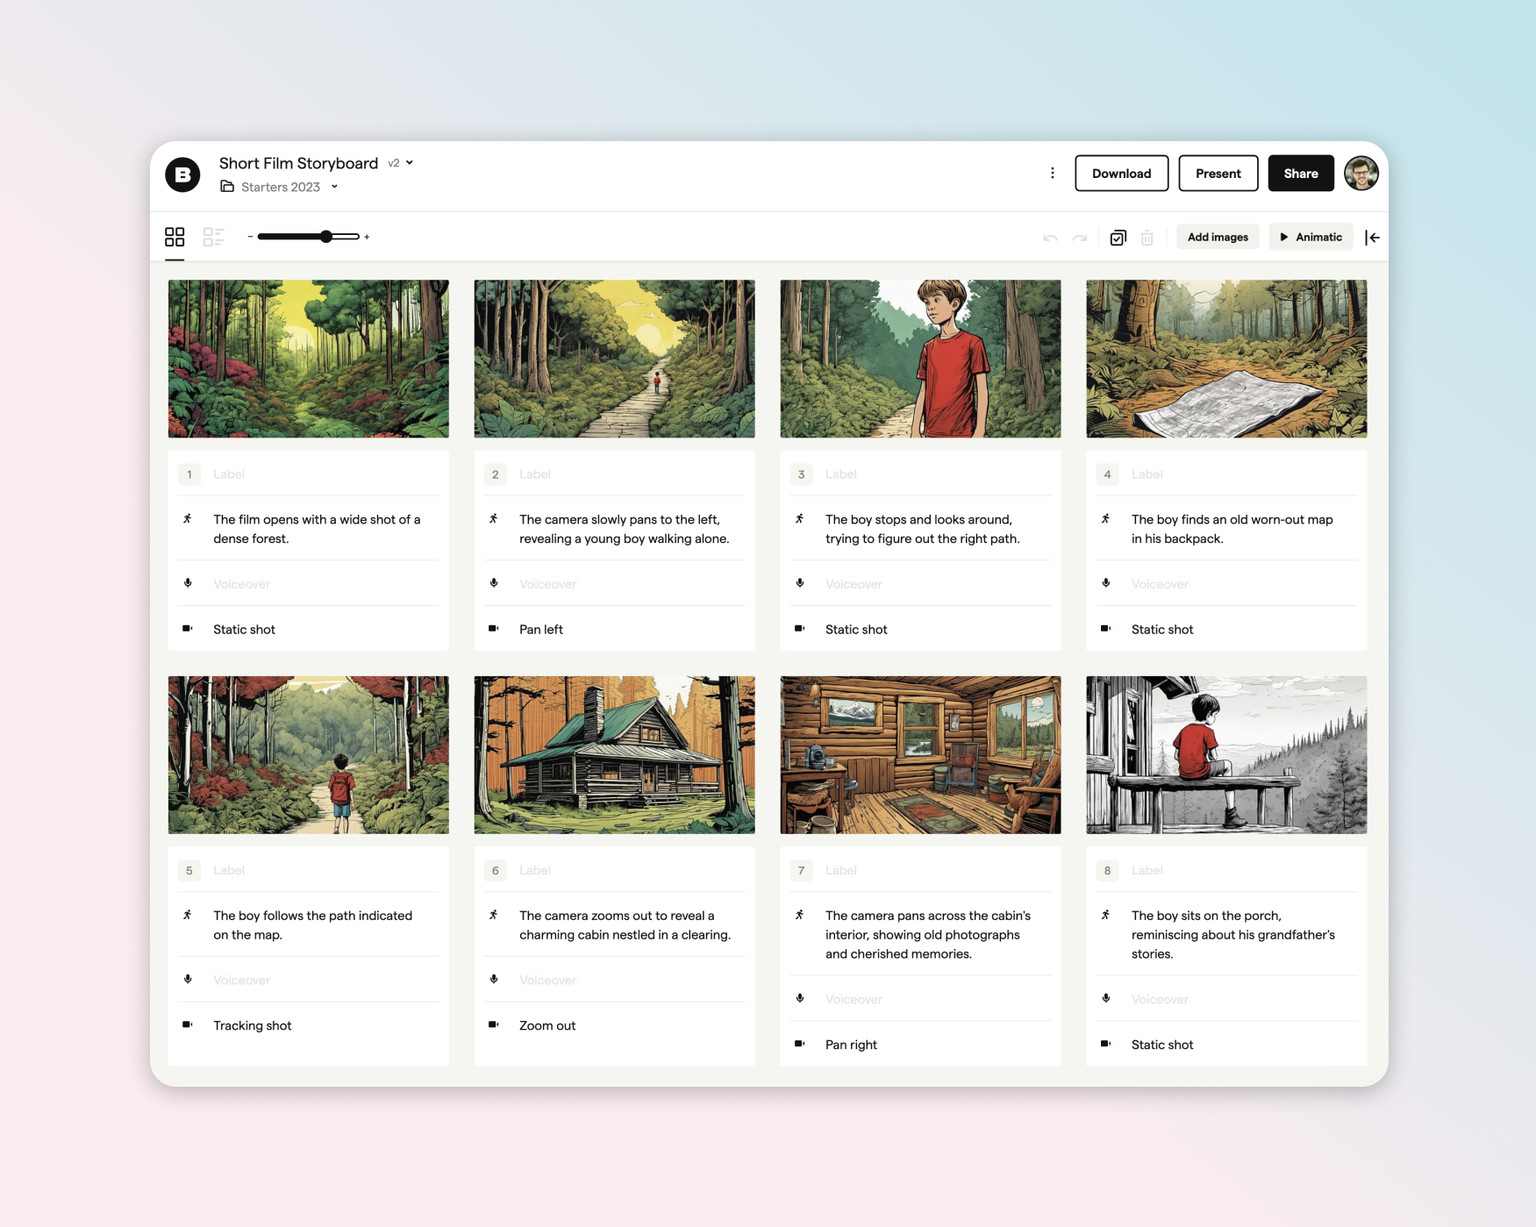
Step 4: Arranging Scenes
Arranging scenes in the right sequence is a crucial step in the storyboarding process, as it shapes the flow and rhythm of your narrative. It's like piecing together a jigsaw puzzle, where each scene is a piece that fits into the larger picture of the book's story. With the scenes sketched out, your next task is to arrange them in the order they appear in the book. This is where Boords truly shines. Its intuitive interface allows you to effortlessly drag and drop your scenes, making rearranging a breeze.
As you arrange your scenes, think about how each one contributes to the overall arc of the story. Does it build tension? Does it provide relief? Is it a turning point for a character?
But remember, storyboarding is not just about chronological order. It's also about pacing, timing, and the emotional journey of your characters. As you arrange your scenes, think about how each one contributes to the overall arc of the story. Does it build tension? Does it provide relief? Is it a turning point for a character? With Boords, you can add notes to each scene, detailing the emotions, actions, and dialogue, giving you a clear overview of your narrative flow. This step is iterative, and you may find yourself revising and rearranging scenes as your storyboard evolves.
Step 5: Depicting Characters and Emotions
Depicting characters and emotions is a critical aspect of storyboarding, as it breathes life into your scenes, making them more than just static pictures. It's about capturing the essence of each character, their personality traits, emotions, and how they interact with the world around them. For instance, a clenched fist could depict anger, while a slouched posture could hint at defeat or sadness. Boords allows you to add detailed notes to each scene, helping you document these nuances and serve as a guide when you start illustrating.
It's essential to remember that emotions are not just about facial expressions, but also body language and context.
On Boords, you can use its digital drawing tools or upload your sketches, enabling you to add expressions and gestures to your characters. It's essential to remember that emotions are not just about facial expressions, but also body language and context. For instance, a character standing alone in a dark room could convey a sense of isolation or fear. So, as you sketch your scenes, think about how you can use visual cues to portray the emotions and inner turmoil of your characters. This step will add depth to your storyboard, making it more engaging and relatable.
Step 6: Reviewing and Revising
 Quickly add notes and direction to your storyboard.
Reviewing and revising your storyboard is a crucial step that should never be overlooked. It's in this phase that you scrutinize each scene, double-checking for consistency, clarity, and flow of your narrative. Every detail, from the depiction of emotions to the sequence of scenes, must align perfectly with your book's narrative, ensuring that your visual story is a true reflection of the written words.
 Add a status to individual frames indicate changes.
Boords makes the process of reviewing and revising a breeze with its collaboration feature. You can invite others to view your storyboard, gather their feedback, and make adjustments in real-time. This collaborative approach not only provides fresh perspectives but also helps catch any inconsistencies or errors that you might have overlooked. Remember, a well-crafted storyboard is the result of meticulous review and revision, so take your time and don't rush this step.
Step 7: Finalizing the Storyboard
 Instantly export your storyboard in multiple formats.
Finalizing the storyboard is the last step, but certainly not the least. This stage is where you refine your work, ensuring that every element is in its right place and serving its purpose. It's akin to the final draft of a book, where every character, plot twist, and dialogue has been meticulously reviewed and revised. The scenes in your storyboard should flow seamlessly like chapters in a book, leading the reader through the narrative you've carefully constructed.
Are the characters developed enough? Are the settings and scenes vividly depicted? Does each storyboard panel contribute to the overall narrative?
In this stage, you'll need to scrutinize every aspect of your storyboard. Check if the visuals and text align with your story's progression. Are the characters developed enough? Are the settings and scenes vividly depicted? Does each storyboard panel contribute to the overall narrative? Think of it as your final opportunity to fine-tune your story before it goes to print. This is your masterpiece, and it deserves your full attention.
On Boords, you can easily refine and finalize your storyboard using its array of tools and features. From adding annotations and tweaking sketches to rearranging scenes and adjusting transitions, you have full control over every element of your storyboard. And once you're satisfied with your creation, you can export it in various formats, ready to be shared with the world.
So there you have it, a step-by-step guide to making a storyboard for a book using Boords. Remember, a storyboard is more than just a collection of sketches; it's a visual representation of your story, capturing its essence and emotion in a compelling and engaging format. So, as you embark on this creative journey, keep in mind the importance of detail, emotion, and consistency. And most importantly, have fun and enjoy the process!
Practical Tips and Examples
Focus on Character Development
Ensure that each character's personality and emotions are clearly depicted in the scenes. For instance, if a character is introverted, show them in corners or away from crowds. Boords allows you to add notes to each scene, helping you capture these nuances.
Incorporate Feedback
Don't shy away from sharing your work with others. Use Boords' collaboration feature to invite others to view your storyboard and provide their inputs. This can help you catch inconsistencies or areas of improvement that you might have overlooked.
Overcome Drawing Challenges
Overcoming common challenges in storyboarding requires patience and practice. For instance, if you struggle with drawing, consider using stick figures or simple shapes to represent characters and objects. Remember, the essence of a storyboard lies in its ability to convey the story visually, not in the complexity of the drawings.
Use the 'Storyboard View'
 Get an overview of your entire storyboard in the grid view.
In Boords, you can also use the 'Storyboard View' to see your entire storyboard at a glance. This can help you assess the flow of your narrative and make necessary adjustments. For example, if a certain scene feels out of place or disrupts the pacing of the story, you can easily rearrange it using the drag-and-drop feature.
Keep the End Goal in Mind
Lastly, your storyboard should serve as a visual guide for your book's narrative. Every scene, character, and dialogue should contribute to the overall story. Constantly ask yourself, "Does this scene add value to the story?" or "Does this character's action align with their personality?" This will ensure that your storyboard remains focused and coherent.
Understanding Storyboard Terminology
Understanding the jargon used in storyboarding is essential for effectively communicating your ideas and collaborating with others. Let's break down some of the common terms you'll encounter.
Shot
'Shot' is a term borrowed from film and television, referring to a single, uninterrupted recording of a scene. In storyboarding, a shot is a single depiction of an event or action, often contained within a single frame.
Scene
'Scene' is a term used to describe a specific event or series of connected actions in your story. A scene usually takes place in a single location and involves specific characters. In a storyboard, a scene may be depicted across multiple frames to capture the progression of events.
Sequence
'Sequence' refers to a series of scenes that together tell a complete part of the story. A sequence can be thought of as a chapter in a book, where multiple scenes come together to advance the plot.
Pan
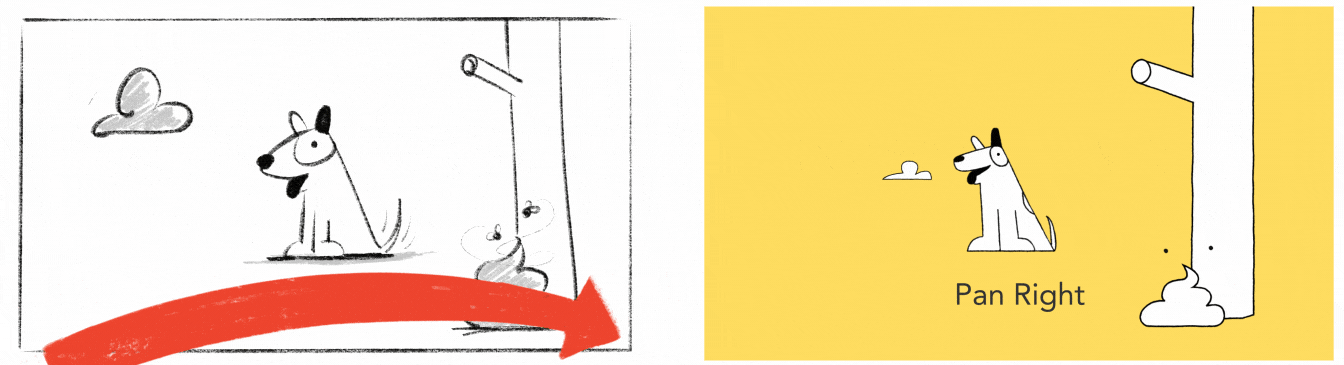
'Pan' is a term used to describe the horizontal movement of the camera from one side to another. In a storyboard, a pan may be indicated by an arrow or a note, showing the direction of the camera movement.
Zoom
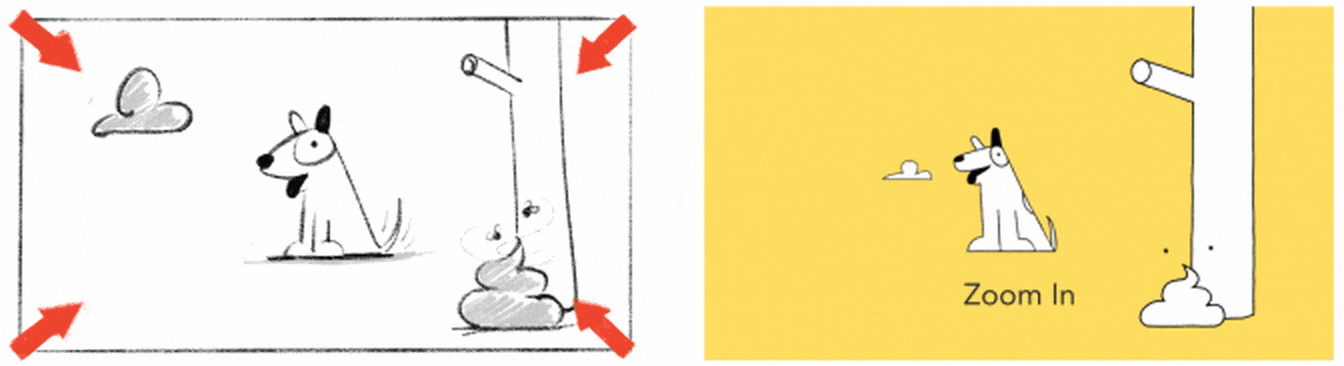
'Zoom' refers to the camera moving closer to or further away from the subject. In a storyboard, a zoom can be represented by drawing the subject larger or smaller in subsequent frames, or by using an arrow to indicate the direction of the zoom.
Understanding these terms will help you create a more effective storyboard, allowing you to accurately depict your story and communicate your ideas.
Sharper preproduction, less back-and-forth
Workflow tips and Boords product updates for video and brand teams, twice a week.
More from the blog
Storyboard software for video agencies & brand teams
One workspace for storyboards, animatics, comments, and approvals.
Spend time on the creative, not the back-and-forth.


Storyboard Activity
Sarah changed the status of Explainer Video v3 to Approved
8 JulSarah viewed Explainer Video v3
8 JulTom shared Explainer Video v3 with sarah@beacon.co, dev@beacon.co
7 JulTom changed the status of Explainer Video v3 to Review Needed
7 JulTom created Explainer Video v3, a new version of Explainer Video v2
7 JulAmara marked a comment on Explainer Video v2 as complete
7 JulDev commented on Explainer Video v2 - Frame 4
6 JulStoryboard Activity
Sarah changed the status of Explainer Video v3 to Approved
8 JulSarah viewed Explainer Video v3
8 JulTom shared Explainer Video v3 with sarah@beacon.co, dev@beacon.co
7 JulTom changed the status of Explainer Video v3 to Review Needed
7 JulTom created Explainer Video v3, a new version of Explainer Video v2
7 JulAmara marked a comment on Explainer Video v2 as complete
7 JulDev commented on Explainer Video v2 - Frame 4
6 Jul